Json&i18n
1.JSON
1.1 概述
JSON (JavaScript Object Notation) 是一种轻量级的数据交换格式。易于人阅读和编写。同时也易于机器解析和生成。JSON采用完全独立于语言的文本格式,而且很多语言都提供了对 json 的支持(包括 C, C++, C#, Java, JavaScript, Perl, Python 等)。 这样就使得 JSON 成为理想的数据交换格式。
json 是一种轻量级的数据交换格式。 轻量级指的是跟 xml 做比较。 数据交换指的是客户端和服务器之间业务数据的传递格式。
1.2 JSON 在 JavaScript 中的使用
1.2.1 json 的定义
json 是由键值对组成,并且由花括号(大括号)包围。每个键由引号引起来,键和值之间使用冒号进行分隔, 多组键值对之间进行逗号进行分隔。
json 定义示例:
// json的定义
var jsonObj = {
    "key1": 12,
    "key2": "abc",
    "key3": true,
    "key4": [11, "arr", false],
    "key5": {
        "key5_1": 551,
        "key5_2": "key5_2_value"
    },
    "key6": [{
        "key6_1_1": 6611,
        "key6_1_2": "key6_1_2_value"
    }, {
        "key6_2_1": 6621,
        "key6_2_2": "key6_2_2_value"
    }]
};
1.2.2 json 的访问
json 本身是一个对象。
json 中的 key 我们可以理解为是对象中的一个属性。
json 中的 key 访问就跟访问对象的属性一样: json 对象.key
json 访问示例:
alert(typeof(jsonObj));// object  json就是一个对象
alert(jsonObj.key1); //12
alert(jsonObj.key2); // abc
alert(jsonObj.key3); // true
alert(jsonObj.key4);// 得到数组[11,"arr",false]
// json 中 数组值的遍历
for(var i = 0; i < jsonObj.key4.length; i++) {
    alert(jsonObj.key4[i]);
}
alert(jsonObj.key5.key5_1);//551
alert(jsonObj.key5.key5_2);//key5_2_value
alert( jsonObj.key6 );// 得到json数组

// 取出来每一个元素都是json对象
var jsonItem = jsonObj.key6[0];
// alert( jsonItem.key6_1_1 ); //6611
alert( jsonItem.key6_1_2 ); //key6_1_2_value

alert(jsonObj);
1.1.3 json 的两个常用方法
json 的存在有两种形式。
一种是:对象的形式存在,我们叫它 json 对象。
一种是:字符串的形式存在,我们叫它 json 字符串。
一般我们要操作 json 中的数据的时候,需要 json 对象的格式。
一般我们要在客户端和服务器之间进行数据交换的时候,使用 json 字符串。
JSON.stringify()
- 把 json 对象转换成为 json 字符串
JSON.parse()
- 把 json 字符串转换成为 json 对象
// 把json对象转换成为 json字符串
var jsonObjString = JSON.stringify(jsonObj); // 特别像 Java中对象的toString
alert(jsonObjString)
// 把json字符串。转换成为json对象
var jsonObj2 = JSON.parse(jsonObjString);
alert(jsonObj2.key1);// 12
alert(jsonObj2.key2);// abc
1.3 JSON 在 java 中的使用
1.3.1 javaBean 和 json 的互转
Person类:
public class Person {

    private Integer id;
    private String name;

    public Person() {
    }

    public Person(Integer id, String name) {
        this.id = id;
        this.name = name;
    }

    public Integer getId() {
        return id;
    }

    public void setId(Integer id) {
        this.id = id;
    }

    public String getName() {
        return name;
    }

    public void setName(String name) {
        this.name = name;
    }

    @Override
    public String toString() {
        return "Person{" +
                "id=" + id +
                ", name='" + name + '\'' +
                '}';
    }
}
测试方法:
 	@Test
    public void test1(){
        Person person = new Person(1,"国哥好帅!");
        // 创建Gson对象实例
        Gson gson = new Gson();
        // toJson方法可以把java对象转换成为json字符串
        String personJsonString = gson.toJson(person);
        System.out.println(personJsonString);//{"id":1,"name":"国哥好帅!"}
        // fromJson把json字符串转换回Java对象
        // 第一个参数是json字符串
        // 第二个参数是转换回去的Java对象类型
        Person person1 = gson.fromJson(personJsonString, Person.class);
        System.out.println(person1);//Person{id=1, name='国哥好帅!'}
    }
1.3.2 List 和 json 的互转
PersonListType类:
public class PersonListType extends TypeToken<ArrayList<Person>> {
}
测试方法:
	@Test
    public void test2() {
        List<Person> personList = new ArrayList<>();

        personList.add(new Person(1, "国哥"));
        personList.add(new Person(2, "康师傅"));

        Gson gson = new Gson();

        // 把List转换为json字符串
        String personListJsonString = gson.toJson(personList);
        System.out.println(personListJsonString);
        //[{"id":1,"name":"国哥"},{"id":2,"name":"康师傅"}]

        List<Person> list = gson.fromJson(personListJsonString, new PersonListType().getType());
        System.out.println(list);
        //[Person{id=1, name='国哥'}, Person{id=2, name='康师傅'}]
        Person person = list.get(0);
        System.out.println(person);
        //Person{id=1, name='国哥'}
    }
1.3.3 map 和 json 的互转
PersonMapType类:
public class PersonMapType extends TypeToken<HashMap<Integer, Person>> {
}
测试方法:
	@Test
    public void test3(){
        Map<Integer,Person> personMap = new HashMap<>();

        personMap.put(1, new Person(1, "国哥好帅"));
        personMap.put(2, new Person(2, "康师傅也好帅"));

        Gson gson = new Gson();
        // 把 map 集合转换成为 json字符串
        String personMapJsonString = gson.toJson(personMap);
        System.out.println(personMapJsonString);//{"1":{"id":1,"name":"国哥好帅"},"2":{"id":2,"name":"康师傅也好帅"}}

//        Map<Integer,Person> personMap2 = gson.fromJson(personMapJsonString, new PersonMapType().getType());
        Map<Integer,Person> personMap2 = gson.fromJson(personMapJsonString, new TypeToken<HashMap<Integer,Person>>(){}.getType());

        System.out.println(personMap2);//{1=Person{id=1, name='国哥好帅'}, 2=Person{id=2, name='康师傅也好帅'}}
        Person p = personMap2.get(1);
        System.out.println(p);//Person{id=1, name='国哥好帅'}

    }
2.i18n 国际化
2.1 概述
- 国际化(
Internationalization)指的是同一个网站可以支持多种不同的语言,以方便不同国家,不同语种的用户访问。 - 关于国际化我们想到的最简单的方案就是为不同的国家创建不同的网站,比如苹果公司,他的英文官网是:http://www.apple.com 而中国官网是 http://www.apple.com/cn
- 苹果公司这种方案并不适合全部公司,而我们希望相同的一个网站,而不同人访问的时候可以根据用户所在的区域显示 不同的语言文字,而网站的布局样式等不发生改变。
- 于是就有了我们说的国际化,国际化总的来说就是同一个网站不同国家的人来访问可以显示出不同的语言。但实际上这 种需求并不强烈,一般真的有国际化需求的公司,主流采用的依然是苹果公司的那种方案,为不同的国家创建不同的页 面。所以国际化的内容我们了解一下即可。
- 国际化的英文
Internationalization,但是由于拼写过长,老外想了一个简单的写法叫做 I18N,代表的是 Internationalization 这个单词,以 I 开头,以 N 结尾,而中间是 18 个字母,所以简写为 I18N。以后我们说 I18N 和国际化是一个意思。
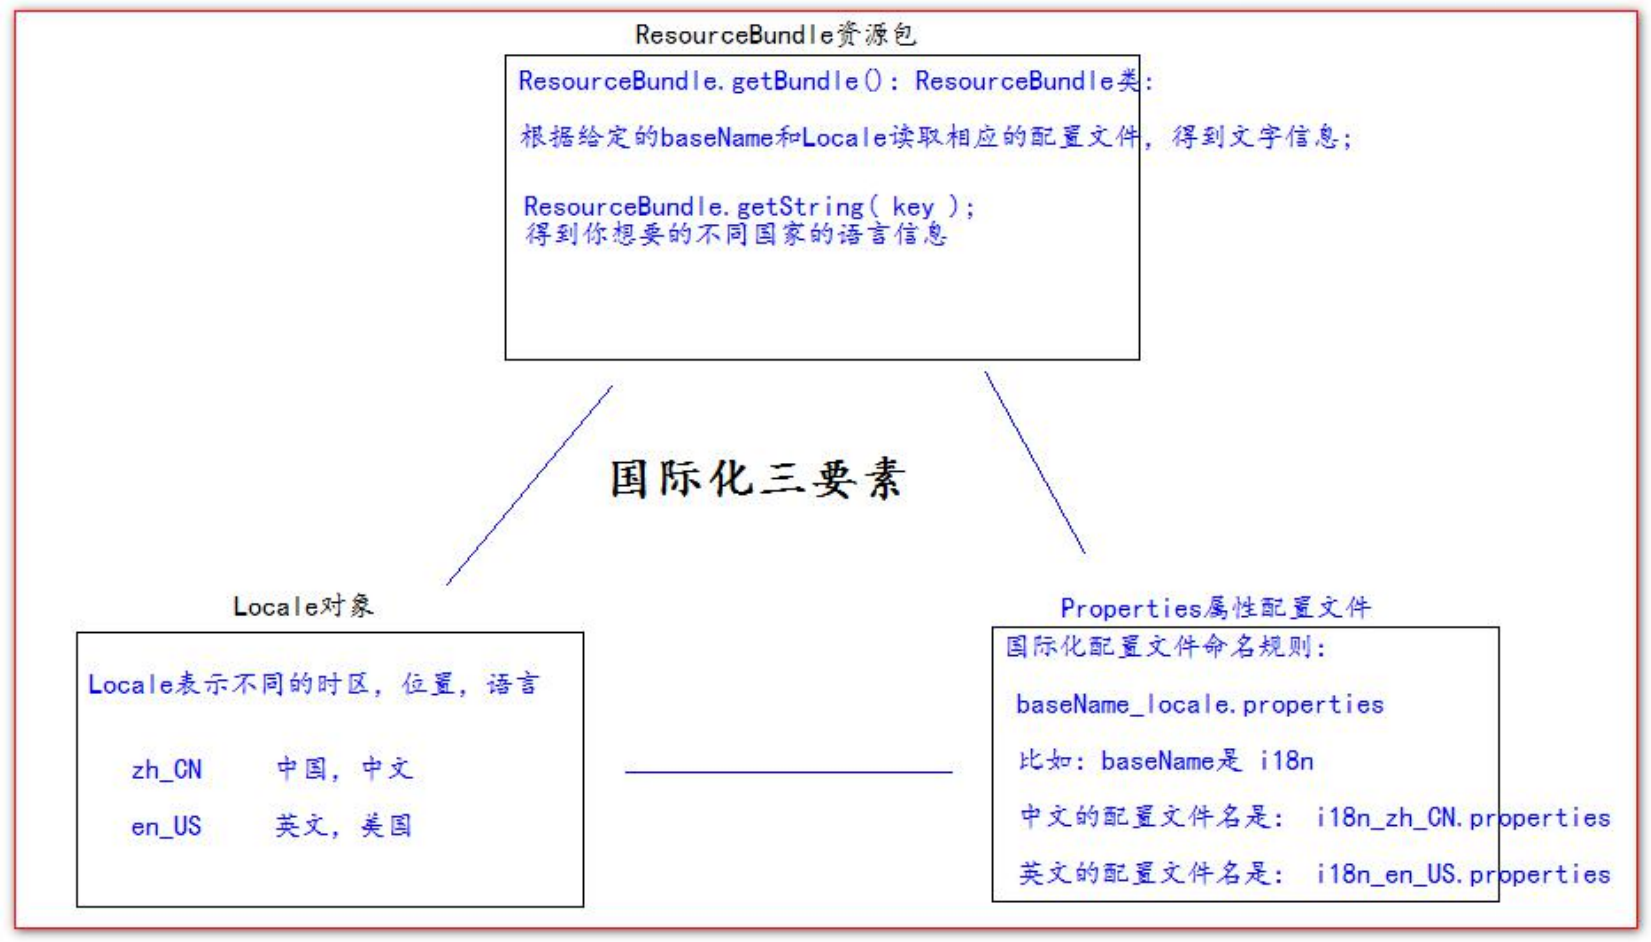
2.2 国际化相关要素介绍
2.3 国际化资源 properties 测试
配置两个语言的配置文件:
i18n_en_US.properties 英文:
username=username
password=password
sex=sex
age=age
regist=regist
boy=boy
email=email
girl=girl
reset=reset
submit=submit
i18n_zh_CN.properties 中文:
username=用户名
password=密码
sex=性别
age=年龄
regist=注册
boy=男
girl=女
email=邮箱
reset=重置
submit=提交
国际化测试代码:
public class I18nTest {

    @Test
    public void testLocale(){
        // 获取你系统默认的语言。国家信息
//        Locale locale = Locale.getDefault();
//        System.out.println(locale);

//        for (Locale availableLocale : Locale.getAvailableLocales()) {
//            System.out.println(availableLocale);
//        }

        // 获取中文,中文的常量的Locale对象
        System.out.println(Locale.CHINA);
        // 获取英文,美国的常量的Locale对象
        System.out.println(Locale.US);

    }

    @Test
    public void testI18n(){
        // 得到我们需要的Locale对象
        Locale locale = Locale.CHINA;
        // 通过指定的basename和Locale对象,读取 相应的配置文件
        ResourceBundle bundle = ResourceBundle.getBundle("i18n", locale);

        System.out.println("username:" + bundle.getString("username"));
        System.out.println("password:" + bundle.getString("password"));
        System.out.println("Sex:" + bundle.getString("sex"));
        System.out.println("age:" + bundle.getString("age"));
    }

}
2.4 通过请求头国际化页面
<%@ page import="java.util.Locale" %>
<%@ page import="java.util.ResourceBundle" %>
<%@ page language="java" contentType="text/html; charset=UTF-8"
pageEncoding="UTF-8"%>
<!DOCTYPE html PUBLIC "-//W3C//DTD HTML 4.01 Transitional//EN" "http://www.w3.org/TR/html4/loose.dtd">
<html>
<head>
<meta http-equiv="pragma" content="no-cache" />
<meta http-equiv="cache-control" content="no-cache" />
<meta http-equiv="Expires" content="0" />
<meta http-equiv="Content-Type" content="text/html; charset=UTF-8">
<title>Insert title here</title>
</head>
<body>
<%
// 从请求头中获取Locale信息(语言)
Locale locale = request.getLocale();
System.out.println(locale);
// 获取读取包(根据 指定的baseName和Locale读取 语言信息)
ResourceBundle i18n = ResourceBundle.getBundle("i18n", locale);
%>
<center>
<h1><%=i18n.getString("regist")%></h1>
<table>
<form>
<tr>
<td><%=i18n.getString("username")%></td>
<td><input name="username" type="text" /></td>
</tr>
<tr>
<td><%=i18n.getString("password")%></td>
<td><input type="password" /></td>
</tr>
<tr>
<td><%=i18n.getString("sex")%></td>
<td>
<input type="radio" /><%=i18n.getString("boy")%>
<input type="radio" /><%=i18n.getString("girl")%>
</td>
</tr>
<tr>
<td><%=i18n.getString("email")%></td>
<td><input type="text" /></td>
</tr>
<tr>
<td colspan="2" align="center">
<input type="reset" value="<%=i18n.getString("reset")%>" />
<input type="submit" value="<%=i18n.getString("submit")%>" /></td>
</tr>
</form>
</table>
<br /> <br /> <br /> <br />
</center>
国际化测试:
<br /> 1、访问页面,通过浏览器设置,请求头信息确定国际化语言。
<br /> 2、通过左上角,手动切换语言
</body>
</html>
2.5 通过显示的选择语言类型进行国际化
<%@ page import="java.util.Locale" %>
<%@ page import="java.util.ResourceBundle" %>
<%@ page language="java" contentType="text/html; charset=UTF-8"
pageEncoding="UTF-8"%>
<!DOCTYPE html PUBLIC "-//W3C//DTD HTML 4.01 Transitional//EN" "http://www.w3.org/TR/html4/loose.dtd">
<html>
<head>
<meta http-equiv="pragma" content="no-cache" />
<meta http-equiv="cache-control" content="no-cache" />
<meta http-equiv="Expires" content="0" />
<meta http-equiv="Content-Type" content="text/html; charset=UTF-8">
<title>Insert title here</title>
</head>
<body>
<%
// 从请求头中获取Locale信息(语言)
Locale locale = null;
String country = request.getParameter("country");
if ("cn".equals(country)) {
locale = Locale.CHINA;
} else if ("usa".equals(country)) {
locale = Locale.US;
} else {
locale = request.getLocale();
}
System.out.println(locale);
// 获取读取包(根据 指定的baseName和Locale读取 语言信息)
ResourceBundle i18n = ResourceBundle.getBundle("i18n", locale);
%>
<a href="i18n.jsp?country=cn">中文</a>|
<a href="i18n.jsp?country=usa">english</a>
<center>
<h1><%=i18n.getString("regist")%></h1>
<table>
<form>
<tr>
<td><%=i18n.getString("username")%></td>
<td><input name="username" type="text" /></td>
</tr>
<tr>
<td><%=i18n.getString("password")%></td>
<td><input type="password" /></td>
</tr>
<tr>
<td><%=i18n.getString("sex")%></td>
<td>
<input type="radio" /><%=i18n.getString("boy")%>
<input type="radio" /><%=i18n.getString("girl")%>
</td>
</tr>
<tr>
<td><%=i18n.getString("email")%></td>
<td><input type="text" /></td>
</tr>
<tr>
<td colspan="2" align="center">
<input type="reset" value="<%=i18n.getString("reset")%>" />
<input type="submit" value="<%=i18n.getString("submit")%>" /></td>
</tr>
</form>
</table>
<br /> <br /> <br /> <br />
</center>
国际化测试:
<br /> 1、访问页面,通过浏览器设置,请求头信息确定国际化语言。
<br /> 2、通过左上角,手动切换语言
</body>
</html>
2.6 JSTL 标签库实现国际化
1 使用标签设置 Locale 信息
<fmt:setLocale value="" />
2 使用标签设置 baseName
<fmt:setBundle basename=""/>
3 输出指定 key 的国际化信息
<fmt:message key="" />
<%@ taglib prefix="fmt" uri="http://java.sun.com/jsp/jstl/fmt" %>
<%@ page language="java" contentType="text/html; charset=UTF-8"
pageEncoding="UTF-8"%>
<!DOCTYPE html PUBLIC "-//W3C//DTD HTML 4.01 Transitional//EN" "http://www.w3.org/TR/html4/loose.dtd">
<html>
<head>
<meta http-equiv="pragma" content="no-cache" />
<meta http-equiv="cache-control" content="no-cache" />
<meta http-equiv="Expires" content="0" />
<meta http-equiv="Content-Type" content="text/html; charset=UTF-8">
<title>Insert title here</title>
</head>
<body>
<%--1 使用标签设置Locale信息--%>
<fmt:setLocale value="${param.locale}" />
<%--2 使用标签设置baseName--%>
<fmt:setBundle basename="i18n"/>
<a href="i18n_fmt.jsp?locale=zh_CN">中文</a>|
<a href="i18n_fmt.jsp?locale=en_US">english</a>
<center>
<h1><fmt:message key="regist" /></h1>
<table>
<form>
<tr>
<td><fmt:message key="username" /></td>
<td><input name="username" type="text" /></td>
</tr>
<tr>
<td><fmt:message key="password" /></td>
<td><input type="password" /></td>
</tr>
<tr>
<td><fmt:message key="sex" /></td>
<td>
<input type="radio" /><fmt:message key="boy" />
<input type="radio" /><fmt:message key="girl" />
</td>
</tr>
<tr>
<td><fmt:message key="email" /></td>
<td><input type="text" /></td>
</tr>
<tr>
<td colspan="2" align="center">
<input type="reset" value="<fmt:message key="reset" />" />
<input type="submit" value="<fmt:message key="submit" />" /></td>
</tr>
</form>
</table>
<br /> <br /> <br /> <br />
</center>
</body>
</html>