第06节_原理解析
1.Profile
为了方便多环境适配,springboot简化了profile功能。
1.1 application-profile功能
- 默认配置文件
application.yaml任何时候都会加载。 - 指定环境配置文件
application-{env}.yaml,env通常替代为test, - 激活指定环境
- 配置文件激活:
spring.profiles.active=prod - 命令行激活:
java -jar xxx.jar --spring.profiles.active=prod --person.name=haha(修改配置文件的任意值,命令行优先)
- 配置文件激活:
- 默认配置与环境配置同时生效
- 同名配置项,profile配置优先
1.2 @Profile条件装配功能
@Configuration(proxyBeanMethods = false)
@Profile("production")
public class ProductionConfiguration {

    // ...

}
@Data
@Component
@ConfigurationProperties("person")//在配置文件中配置
public class Person{
    private String name;
    private Integer age;
}
application.properties
person:
  name: atguigu
  age: 8
public interface Person {

   String getName();
   Integer getAge();

}

@Profile("test")//加载application-test.yaml里的
@Component
@ConfigurationProperties("person")
@Data
public class Worker implements Person {

    private String name;
    private Integer age;
}

@Profile(value = {"prod","default"})//加载application-prod.yaml里的
@Component
@ConfigurationProperties("person")
@Data
public class Boss implements Person {

    private String name;
    private Integer age;
}
application-test.yaml
person:
  name: test-张三

server:
  port: 7000
application-prod.yaml
person:
  name: prod-张三

server:
  port: 8000
application.properties
# 激活prod配置文件
spring.profiles.active=prod
@Autowired
private Person person;

@GetMapping("/")
public String hello(){
    //激活了prod,则返回Boss;激活了test,则返回Worker
    return person.getClass().toString();
}
@Profile还可以修饰在方法上:
class Color {
}

@Configuration
public class MyConfig {

    @Profile("prod")
    @Bean
    public Color red(){
        return new Color();
    }

    @Profile("test")
    @Bean
    public Color green(){
        return new Color();
    }
}
可以激活一组:
spring.profiles.active=production

spring.profiles.group.production[0]=proddb
spring.profiles.group.production[1]=prodmq
1.3 profile分组
spring.profiles.group.production[0]=proddb
spring.profiles.group.production[1]=prodmq

使用:spring.profiles.active=production  激活
2.外部化配置
官方文档 - Externalized Configuration
Spring Boot uses a very particular PropertySource order that is designed to allow sensible overriding of values. Properties are considered in the following order (with values from lower items overriding earlier ones)(1优先级最低,14优先级最高):
- Default properties (specified by setting
SpringApplication.setDefaultProperties). @PropertySourceannotations on your@Configurationclasses. Please note that such property sources are not added to theEnvironmentuntil the application context is being refreshed. This is too late to configure certain properties such aslogging.*andspring.main.*which are read before refresh begins.- Config data (such as
application.propertiesfiles) - A
RandomValuePropertySourcethat has properties only inrandom.*. - OS environment variables.
- Java System properties (
System.getProperties()). - JNDI attributes from
java:comp/env. ServletContextinit parameters.ServletConfiginit parameters.- Properties from
SPRING_APPLICATION_JSON(inline JSON embedded in an environment variable or system property). - Command line arguments.
propertiesattribute on your tests. Available on@SpringBootTestand the test annotations for testing a particular slice of your application.@TestPropertySourceannotations on your tests.- Devtools global settings properties in the
$HOME/.config/spring-bootdirectory when devtools is active.
import org.springframework.stereotype.*;
import org.springframework.beans.factory.annotation.*;

@Component
public class MyBean {

    @Value("${name}")//以这种方式可以获得配置值
    private String name;

    // ...

}
2.1 外部配置源
常用:Java属性文件、YAML文件、环境变量、命令行参数;
2.2 配置文件查找位置
(1) classpath 根路径
(2) classpath 根路径下config目录
(3) jar包当前目录
(4) jar包当前目录的config目录
(5) /config子目录的直接子目录
2.3 配置文件加载顺序:
- 当前jar包内部的application.properties和application.yml
- 当前jar包内部的application-{profile}.properties 和 application-{profile}.yml
- 引用的外部jar包的application.properties和application.yml
- 引用的外部jar包的application-{profile}.properties 和 application-{profile}.yml
2.4 指定环境优先,外部优先,后面的可以覆盖前面的同名配置项
3.自定义starter
3.1 starter启动原理
- starter-pom引入 autoconfigurer 包
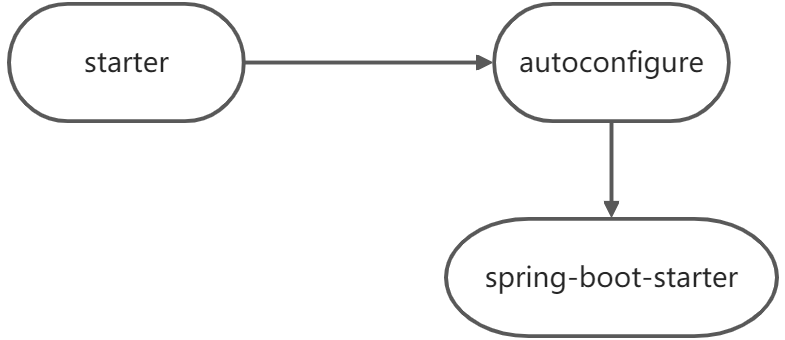
autoconfigure包中配置使用
META-INF/spring.factories中EnableAutoConfiguration的值,使得项目启动加载指定的自动配置类编写自动配置类
xxxAutoConfiguration->xxxxProperties@Configuration@Conditional@EnableConfigurationProperties@Bean- ......
引入starter ---
xxxAutoConfiguration--- 容器中放入组件 ----绑定xxxProperties---- 配置项
3.2 自定义starter
atguigu-hello-spring-boot-starter(启动器)
atguigu-hello-spring-boot-starter-autoconfigure(自动配置包)
目标:创建
HelloService的自定义starter。创建两个工程,分别命名为
hello-spring-boot-starter(普通Maven工程),hello-spring-boot-starter-autoconfigure(需用用到Spring Initializr创建的Maven工程)。hello-spring-boot-starter无需编写什么代码,只需让该工程引入hello-spring-boot-starter-autoconfigure依赖:
<?xml version="1.0" encoding="UTF-8"?>
<project xmlns="http://maven.apache.org/POM/4.0.0"
         xmlns:xsi="http://www.w3.org/2001/XMLSchema-instance"
         xsi:schemaLocation="http://maven.apache.org/POM/4.0.0 http://maven.apache.org/xsd/maven-4.0.0.xsd">
    <modelVersion>4.0.0</modelVersion>

    <groupId>com.atguigu</groupId>
    <artifactId>hello-spring-boot-starter</artifactId>
    <version>1.0.0-SNAPSHOT</version>

    <dependencies>
        <dependency>
            <groupId>com.atguigu</groupId>
            <artifactId>hello-spring-boot-starter-autoconfigure</artifactId>
            <version>1.0.0-SNAPSHOT</version>
        </dependency>
    </dependencies>

</project>
hello-spring-boot-starter-autoconfigure的pom.xml如下:
<?xml version="1.0" encoding="UTF-8"?>
<project xmlns="http://maven.apache.org/POM/4.0.0" xmlns:xsi="http://www.w3.org/2001/XMLSchema-instance"
	xsi:schemaLocation="http://maven.apache.org/POM/4.0.0 https://maven.apache.org/xsd/maven-4.0.0.xsd">
	<modelVersion>4.0.0</modelVersion>
	<parent>
		<groupId>org.springframework.boot</groupId>
		<artifactId>spring-boot-starter-parent</artifactId>
		<version>2.4.2</version>
		<relativePath/> <!-- lookup parent from repository -->
	</parent>
	<groupId>com.atguigu</groupId>
	<artifactId>hello-spring-boot-starter-autoconfigure</artifactId>
	<version>1.0.0-SNAPSHOT</version>
	<name>hello-spring-boot-starter-autoconfigure</name>
	<description>Demo project for Spring Boot</description>
	<properties>
		<java.version>1.8</java.version>
	</properties>

	<dependencies>
		<dependency>
			<groupId>org.springframework.boot</groupId>
			<artifactId>spring-boot-starter</artifactId>
		</dependency>
	</dependencies>
</project>
- 创建4个文件:
com/atguigu/hello/auto/HelloServiceAutoConfigurationcom/atguigu/hello/bean/HelloPropertiescom/atguigu/hello/service/HelloServicesrc/main/resources/META-INF/spring.factories
HelloServiceAutoConfiguration.java
import com.atguigu.hello.bean.HelloProperties;
import com.atguigu.hello.service.HelloService;
import org.springframework.boot.autoconfigure.condition.ConditionalOnMissingBean;
import org.springframework.boot.context.properties.EnableConfigurationProperties;
import org.springframework.context.annotation.Bean;
import org.springframework.context.annotation.Configuration;

@Configuration
@ConditionalOnMissingBean(HelloService.class)
@EnableConfigurationProperties(HelloProperties.class)//默认HelloProperties放在容器中
public class HelloServiceAutoConfiguration {

    @Bean
    public HelloService helloService(){
        return new HelloService();
    }

}
HelloProperties.java
import org.springframework.boot.context.properties.ConfigurationProperties;

@ConfigurationProperties("hello")
public class HelloProperties {
    private String prefix;
    private String suffix;

    public String getPrefix() {
        return prefix;
    }

    public void setPrefix(String prefix) {
        this.prefix = prefix;
    }

    public String getSuffix() {
        return suffix;
    }

    public void setSuffix(String suffix) {
        this.suffix = suffix;
    }
}
HelloService.java
import com.atguigu.hello.bean.HelloProperties;
import org.springframework.beans.factory.annotation.Autowired;


/**
 * 默认不要放在容器中
 */
public class HelloService {

    @Autowired
    private HelloProperties helloProperties;

    public String sayHello(String userName){
        return helloProperties.getPrefix() + ": " + userName + " > " + helloProperties.getSuffix();
    }
}
spring.factories
# Auto Configure
org.springframework.boot.autoconfigure.EnableAutoConfiguration=\
com.atguigu.hello.auto.HelloServiceAutoConfiguration
用maven插件,将两工程install到本地。
接下来,测试使用自定义starter,用Spring Initializr创建名为
hello-spring-boot-starter-test工程,引入hello-spring-boot-starter依赖,其pom.xml如下:
<?xml version="1.0" encoding="UTF-8"?>
<project xmlns="http://maven.apache.org/POM/4.0.0" xmlns:xsi="http://www.w3.org/2001/XMLSchema-instance"
         xsi:schemaLocation="http://maven.apache.org/POM/4.0.0 https://maven.apache.org/xsd/maven-4.0.0.xsd">
    <modelVersion>4.0.0</modelVersion>
    <parent>
        <groupId>org.springframework.boot</groupId>
        <artifactId>spring-boot-starter-parent</artifactId>
        <version>2.4.2</version>
        <relativePath/> <!-- lookup parent from repository -->
    </parent>
    <groupId>com.atguigu</groupId>
    <artifactId>hello-spring-boot-starter-test</artifactId>
    <version>1.0.0-SNAPSHOT</version>
    <name>hello-spring-boot-starter-test</name>
    <description>Demo project for Spring Boot</description>
    <properties>
        <java.version>1.8</java.version>
    </properties>
    <dependencies>
        <dependency>
            <groupId>org.springframework.boot</groupId>
            <artifactId>spring-boot-starter</artifactId>
        </dependency>

        <dependency>
            <groupId>org.springframework.boot</groupId>
            <artifactId>spring-boot-starter-test</artifactId>
            <scope>test</scope>
        </dependency>

        <!-- 引入`hello-spring-boot-starter`依赖 -->
        <dependency>
            <groupId>com.atguigu</groupId>
            <artifactId>hello-spring-boot-starter</artifactId>
            <version>1.0.0-SNAPSHOT</version>
        </dependency>

    </dependencies>

    <build>
        <plugins>
            <plugin>
                <groupId>org.springframework.boot</groupId>
                <artifactId>spring-boot-maven-plugin</artifactId>
            </plugin>
        </plugins>
    </build>

</project>
- 添加配置文件
application.properties:
hello.prefix=hello
hello.suffix=666
- 添加单元测试类:
import com.atguigu.hello.service.HelloService;//来自自定义starter
import org.junit.jupiter.api.Assertions;
import org.junit.jupiter.api.Test;
import org.springframework.beans.factory.annotation.Autowired;
import org.springframework.boot.test.context.SpringBootTest;

@SpringBootTest
class HelloSpringBootStarterTestApplicationTests {

    @Autowired
    private HelloService helloService;

    @Test
    void contextLoads() {
        // System.out.println(helloService.sayHello("atguigu"));
        Assertions.assertEquals("hello: atguigu > 666", helloService.sayHello("atguigu"));
    }

}
4.SpringBoot原理
Spring原理【Spring注解】、SpringMVC原理、自动配置原理、SpringBoot原理
4.1 SpringBoot启动过程
创建 SpringApplication
保存一些信息。
判定当前应用的类型。ClassUtils。Servlet
bootstrappers:初始启动引导器(List<Bootstrapper>):去spring.factories文件中找org.springframework.boot.Bootstrapper找
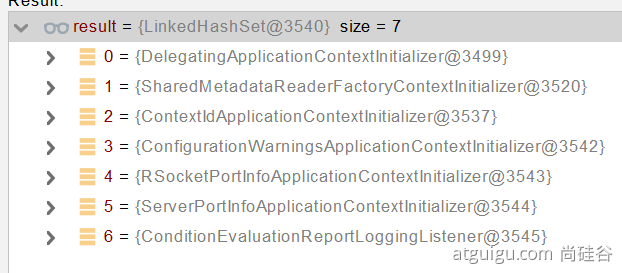
ApplicationContextInitializer;去spring.factories找ApplicationContextInitializerList<ApplicationContextInitializer<?> initializers
找
ApplicationListener;应用监听器。去spring.factories找ApplicationListenerList<ApplicationListener<?> listeners
运行 SpringApplication
StopWatch- 记录应用的启动时间
- 创建引导上下文(Context环境)
createBootstrapContext()- 获取到所有之前的
bootstrappers挨个执行intitialize()来完成对引导启动器上下文环境设置
- 获取到所有之前的
- 让当前应用进入
headless模式。java.awt.headless - 获取所有
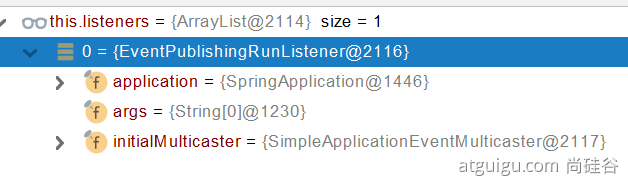
RunListener(运行监听器)【为了方便所有Listener进行事件感知】getSpringFactoriesInstances去spring.factories找SpringApplicationRunListener.
- 遍历
SpringApplicationRunListener调用starting方法;- 相当于通知所有感兴趣系统正在启动过程的人,项目正在 starting。
- 保存命令行参数;
ApplicationArguments - 准备环境
prepareEnvironment();- 返回或者创建基础环境信息对象。
StandardServletEnvironment - 配置环境信息对象。
- 读取所有的配置源的配置属性值。
- 绑定环境信息
- 监听器调用
listener.environmentPrepared();通知所有的监听器当前环境准备完成
- 返回或者创建基础环境信息对象。
- 创建IOC容器(
createApplicationContext())- 根据项目类型(
Servlet)创建容器, - 当前会创建
AnnotationConfigServletWebServerApplicationContext
- 根据项目类型(
- 准备ApplicationContext IOC容器的基本信息
prepareContext()- 保存环境信息
- IOC容器的后置处理流程。
- 应用初始化器;
applyInitializers;- 遍历所有的
ApplicationContextInitializer。调用initialize.。来对ioc容器进行初始化扩展功能 - 遍历所有的 listener 调用
contextPrepared。EventPublishRunListenr;通知所有的监听器contextPrepared
- 遍历所有的
- 所有的监听器 调用
contextLoaded。通知所有的监听器contextLoaded;
- 刷新IOC容器。
refreshContext- 创建容器中的所有组件(Spring注解)
- 容器刷新完成后工作?afterRefresh
- 所有监听 器 调用
listeners.started(context); 通知所有的监听器 started - 调用所有
runners;callRunners()- 获取容器中的
ApplicationRunner - 获取容器中的
CommandLineRunner - 合并所有
runner并且按照@Order进行排序 - 遍历所有的
runner。调用run方法
- 获取容器中的
- 如果以上有异常,
- 调用
Listener的failed
- 调用
- 调用所有监听器的
running方法listeners.running(context); 通知所有的监听器running running如果有问题。继续通知failed。调用所有Listener的failed;通知所有的监听器failed
public interface Bootstrapper {

	/**
	 * Initialize the given {@link BootstrapRegistry} with any required registrations.
	 * @param registry the registry to initialize
	 */
	void intitialize(BootstrapRegistry registry);

}

@FunctionalInterface
public interface ApplicationRunner {

	/**
	 * Callback used to run the bean.
	 * @param args incoming application arguments
	 * @throws Exception on error
	 */
	void run(ApplicationArguments args) throws Exception;

}
@FunctionalInterface
public interface CommandLineRunner {

	/**
	 * Callback used to run the bean.
	 * @param args incoming main method arguments
	 * @throws Exception on error
	 */
	void run(String... args) throws Exception;

}
4.2 Application Events and Listeners
https://docs.spring.io/spring-boot/docs/current/reference/html/spring-boot-features.html#boot-features-application-events-and-listeners
ApplicationContextInitializer
ApplicationListener
SpringApplicationRunListener
4.3 ApplicationRunner 与 CommandLineRunner
5.总结
路漫漫其修远兮,吾将上下而求索。
纸上得来终觉浅,绝知此事要躬行。
Spring Boot 2 场景整合篇
- 虚拟化技术
- 安全控制
- 缓存技术
- 消息中间件
- 对象存储
- 定时调度
- 异步任务
- 分布式系统
Spring Boot 2 响应式编程
- 响应式编程基础
- Webflux开发Web应用
- 响应式访问持久化层
- 响应式安全开发
- 响应式原理